Recipe: Delicious Homemade No-Knead Rustic Bread
Homemade No-Knead Rustic Bread. In this video I show you how to make this easy rustic bread recipe for delicious crusty homemade bread that tastes great! Best of all this is a no knead. This is a recipe I have tweaked over time and I hope you truly love it.
 Faster Rustic No-Knead Bread, made with easy pantry ingredients. This easy recipe makes fresh, homemade bread that you can serve with dinner tonight! I have great news for you today! Homemade No-Knead Rustic Bread most diverse and have mind sense that unique. Several kinds of Homemade No-Knead Rustic Bread recipes are also enough easy to process and do not pick up long. Although not everybody likes Homemade No-Knead Rustic Bread food, nowadays some people are get attached and like the various Homemade No-Knead Rustic Bread foods on hand. This can be visible than the number of restaurants that supply Homemade No-Knead Rustic Bread as one of the dish. You can cook Homemade No-Knead Rustic Bread using 5 ingredients and 7 steps. Here is how you cook it.
Ingredients of Homemade No-Knead Rustic Bread
- You need 3 Cups of All-purpose Flour (Plus extra for working with Dough).
- It's 1 1/2-2 tsp of Salt.
- You need 2 tsp of Sugar.
- Prepare 3/4 tsp of Dry Active Yeast.
- Prepare 1 1/2 Cups of Warm Water.
Just remember these words…Yes, you can! Yes, you can make an amazing loaf of bread! It was one of my personal goals to try out bread making for the very first time this winter season. Baking comforting food and hibernating indoors is a good combination I think, and there's nothing better than warm homemade bread with good butter.
Homemade No-Knead Rustic Bread step by step
- In a large measuring glass, heat 1 1/2 Cups Water in the microwave. Water should just be noticably warm to the touch, not too cold or hot. Add Sugar & Yeast. Stir. Set aside for a few minutes, as the Yeast starts to activate..
- Add Water mixture to a Large Mixing Bowl. Sift in Flour & Salt. Stir with a Dough Whisk until incorporated & there are no dry spots. Scrap the sides well. Dough will be wet & shaggy, sticky to the touch. If it's too wet, add small amounts of flour until correct texture is reached. Just remember, it's supposed to be wet & jiggly, not soupy or dry/firm..
- Don't touch or form the Dough. Leave it in the bowl, as is, & cover it with a tea towel or plastic wrap. Place in a warm place in your house, & allow to rise for 6 - 8 hours. You can also place it in the refrigerator, after it's risen for about 3 hours on the counter. You can leave it in there as long as you need to, until you're ready to bake. (Up to 2 weeks).
- Uncover Dough. It should have risen considerably. With your hands or a floured bowl scraper, pour Dough onto a floured sheet of parchment paper. I like to use two pieces criss crossed, so that lifting it is easier. Now, you'll flip the dough over on itself using hands or scraper. I flip in a cross pattern toward the center, facing up. Fold each side into the center, then flip over completely. The top should be round and smooth. Tuck & smooth the bottom edges, in order to make a round shape..
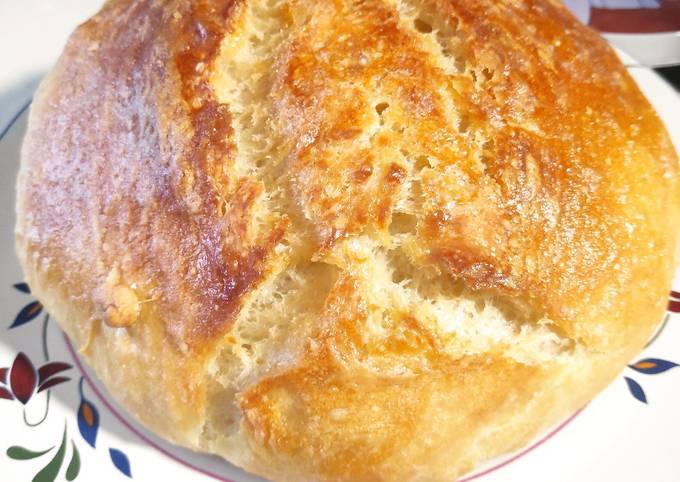
- Lift parchment paper & Dough, lower them back into your Mixing Bowl. Cover & allow to rise for 1 hour. Preheat oven to 450°. After a half hour, place empty Dutch Oven with Lid in Oven to preheat. Once Dough has risen, take Dutch Oven out and lower the Parchment/Dough into the Dutch Oven. Be careful, that Dutch Oven is super hot! Score top w/knife. Cover with lid, & bake for 30 Minutes. Uncover, & bake for another 15 Minutes. Grab parchment paper and lift Bread out, place on a Cooling Rack..
- Allow to cool for at least 20 Minutes before slicing. I like to rub a little bit of butter over the top, while still hot. Store leftovers for up to 3 days, covered, or cover with plastic wrap/foil and refrigerate for up to a few months. Enjoy!.
- Alternative No Dutch Oven Method: Line a baking sheet with Parchment. Prepare Dough the same way, except shape the Dough Ball into an oblong log shape instead. Lay the Dough Log in the middle of Parchment, lengthwise. Cover with a towel or plastic wrap, & let rise for 45 Minutes. Score top. Fill another baking sheet with hot water & put on bottom rack of Oven. Place Dough in Oven, then spritz the sides of the Oven w/water before closing door. Wait a Minute, then spritz again. Bake for 30 Minutes.
This no-knead bread has got wonderful texture, just look at those air-pockets. Read below to learn how to make this rustic white bread with just four No-knead bread thus involves less physical work due to lack of kneading but requires patience as the dough should be allowed to rest much longer. No-knead bread is easy to make and infinitely adaptable. For this garlic bread-inspired version, you'll start by mixing up the classic combination of flour Baking this bread is going to make your house smell so fantastic that you could probably get away with serving it with butter and calling that dinner. Homemade No Knead Bread requires neither time nor expertise!
Got ingredients for manufacture Homemade No-Knead Rustic Bread recipes is also not hard. You can easily get the main ingredients at the closest supermarket and even on the market. There are much types of Homemade No-Knead Rustic Bread that are easy and fast to process into delicious dish. You can constantly practice this Homemade No-Knead Rustic Bread recipe at home, and can serve it to your children and extended family. If you wish to cook another foods on our website, we supply various types of food recipes which are of certainly very delicious and enjoyable to enjoy, please try they.

No comments:
Post a Comment